Find your way around the editor
Learn the scene controls, panels, cameras, and selection tools before making changes.
The editor layout
| Control | Use it for |
|---|---|
| Scene source | Choose the scan/model scene you are currently inspecting. Check this before sending a task. |
| Chat | Ask questions, follow tool activity, attach references, and revisit conversations for this scene. |
| Files | Find original inputs, reference documents, and generated outputs. |
| Objects | Open the scene-side panel, including agent activity. Ask Chat to list, identify, or change scene objects. |
| File | Open/convert a source, import a model or scene JSON, download scene data, or reset the scene. |
| View | Fit the scene, switch visible layers and navigation mode, and show tool windows. |
| Tools | Open camera/geometry controls, evaluate fit, take pictures, and mark a point region. |
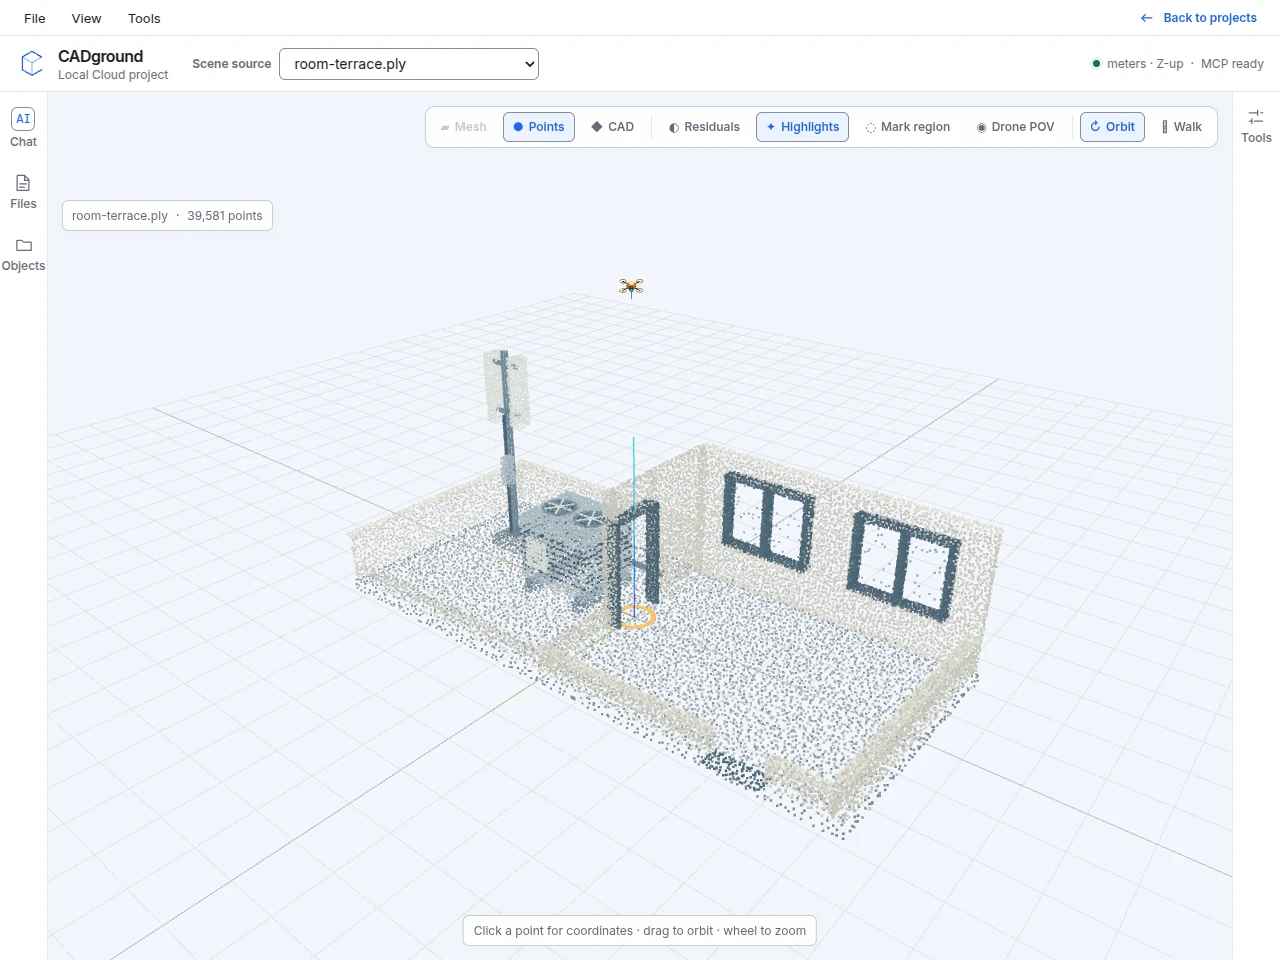
This screenshot uses a computer-generated example in the local app. It shows the main controls. The close-ups below show more detail. CAD is hidden here so you can see the source points.
- Chat, Files, Objects. Use the left rail to ask the agent, browse files, and inspect available object or activity information.
- Scene source. Confirm the filename before giving instructions. Switching the source changes the scene you are inspecting.
- Display and navigation. Toggle Points and CAD, mark a region, or choose Orbit and Walk. A highlighted control is enabled.
- Tools. Open the right panel for the virtual camera, geometry exports, and fit evaluation.
Navigate the scene
Start with View → Fit scene. This brings the current scene into view if you are too close, too far away, or facing the wrong direction.
| Mode or action | How it works |
|---|---|
| Orbit | Choose View → Navigation → Orbit. Drag with the left mouse button to rotate around the view target. Use the wheel to zoom; the secondary mouse drag pans the view. |
| Walk | Choose View → Navigation → Walk. Click the viewport to give it keyboard focus. Drag with the left mouse button to look around. |
| Walk movement | W/A/S/D move forward/left/back/right. Space moves up; Ctrl moves down. Hold Shift for faster movement. |
| Mouse-only camera control | Open Tools and use the virtual-camera direction and rotation buttons. Set Move step in meters and Rotate step in degrees. |
| Recover the view | Use Fit scene for the overview, or Reset in the virtual-camera controls. Clear an active focus if it is hiding the rest of the scene. |
If movement keys type into Chat, the text box still has focus. Click the viewport first. Navigation describes a virtual view of your data; it does not control a physical drone.
Show the evidence you need
Under View → Display, switch layers such as Mesh, Points, CAD, Residuals, and Highlights. Show the source and CAD together to judge alignment, then hide one temporarily to inspect the other. Hiding an object or layer does not delete it.
Drone POV shows the virtual camera’s view. Your overview can show a different angle from the agent’s camera. Tell the agent which view you mean, or ask it to capture your current view.
Inspect a point’s coordinates
Click a visible scan point in the main 3D view. A small panel shows its ID and X, Y, and Z coordinates in meters. If objects overlap, check the point from another view. Use the close button to hide the panel.
One point gives a position, not a distance. To measure a feature, choose two endpoints or defined surfaces. Follow the measurement procedure.
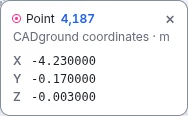
Click a scan point to open this panel. Point is the sample’s ID. X, Y, and Z are its scene coordinates in meters. This is one point, not a distance measurement. More decimal places do not mean a more accurate scan.
Open full-size screenshot (new tab)Use the virtual camera
- Open the Tools window from the View menu if it is hidden.
- Select the virtual camera, such as Drone 01. Use + Drone when you need another camera position.
- Set a useful movement step in meters. Small steps help with close interior inspection; larger steps help navigate a site.
- Use direction controls and yaw, pitch, or roll to position the view. Use Look at center or Reset to recover.
- Select Take picture for a captured view. Ask the agent to use clearly named views in a report if you need a repeatable record.
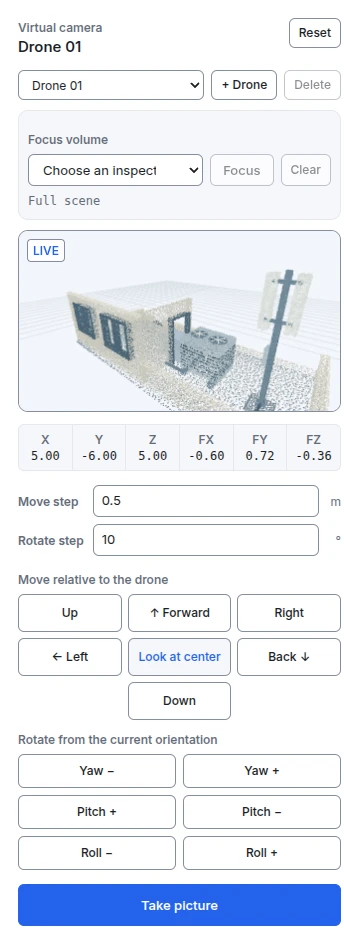
- Selected drone. Choose the virtual camera to control. A drone here is a camera in the scene, not a physical aircraft.
- Live view. Check what this camera sees. The preview can differ from your main viewport.
- Move step. Set the distance per movement in meters. Set the rotation step below it in degrees.
- Move and rotate. Reposition the camera using the buttons, checking the preview as you go.
- Take picture. Capture the current camera view once the feature is clearly visible. A picture records a view; it does not establish a measurement by itself.
Focus and point regions
Focus shows a selected part of the scene. Use it to separate an antenna from its support or a wall from the room. If the scene looks unexpectedly empty, select Clear to show the full scene.
For a manually marked point region:
- Select Tools → Mark region.
- Use Add to paint points into the selection and Remove to remove unwanted points. Adjust the brush radius for the detail you need.
- Switch to Navigate to change the view between strokes. The brush works on visible points; a single view does not select every hidden face.
- Use Undo stroke or Clear to correct the draft.
- Select Save region to keep the selection, or Cancel to abandon the draft. Name the region in your next AI request.
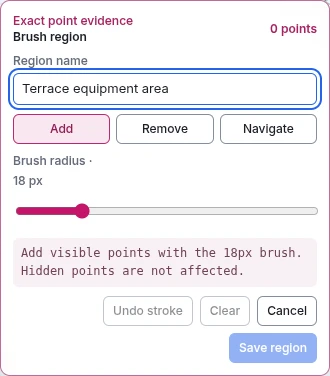
The screenshot shows a new region before painting: 0 points are selected, so Save region is disabled.
- Region name. Use a name that identifies the physical area you want to inspect.
- Add, Remove, Navigate. Add paints visible points into the selection; Remove subtracts them. Use Navigate to change the view, then continue painting.
- Brush radius. Adjust the brush size in screen pixels. Hidden points are not included automatically.
- Save region. Save after selecting points and reviewing them from more than one view. Cancel discards this brush draft.
Connection and saving
MCP ready means the editor is connected to the CADground tools. It does not mean a separate AI app has permission to connect. To connect ChatGPT, Claude, or Codex, use Connect AI in the Cloud project.
The project saves scene changes as they happen. Wait for the current action to finish before leaving. Export important versions of your work. Stop interrupts a task but does not undo changes already made. There is no single undo action for a whole AI task. Reset scene removes scene work; it does not just reset the view.