
Work with CADground AI
Ask your question, provide the requirements, and check the result in the same conversation.
Start a conversation
- Open the correct project and confirm Scene source.
- Select the Chat tab on the left.
- Select + New conversation to start a task. To continue a task, open its existing conversation.
- Enter your request and select Send. Enter also sends; use the on-screen button when working with a mouse or voice.
- Answer the agent’s questions in the same conversation. Clear up uncertain details before it changes the model.
The built-in Chat is already connected to the project’s tools. You do not need to configure MCP, paste an API key, or install a separate AI application.
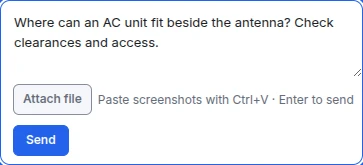
This is an unsent example prompt. It shows how to ask; it is not an AI answer or an approved installation position.
- Message. Describe the decision you need help with. Follow up with equipment dimensions, required clearances, and the evidence the agent should check.
- Attach file. Add a drawing, image, or specification, then explain what it represents. Wait for the attachment to finish uploading.
- Send. Start the request after checking the active scene. Review the agent’s evidence and measurements before accepting a conclusion.
Ask a real project question
Start with the decision you need to make. Name the objects, requirements, reference files, and output you need. You do not need to name a tool.
Where could I install this AC unit beside the telecom antenna on the terrace? Use the attached manufacturer dimensions and clearance diagram. Compare two positions and show the measured gaps. List any requirements that the scan cannot confirm.
Compare the as-built room with the attached planned layout. Confirm units and alignment first. Report differences in wall positions and openings, with annotated views and any uncertain matches.
Reconstruct the visible walls and openings as editable CAD. Follow the scanned shape; do not make the room perfectly square. Leave surfaces missing if they were not captured. If you add an inferred surface, label it clearly. Compare the result with the scan.
If the request has several tasks, ask the agent to list the steps first. Start with one area or object.
Give enough context to avoid guessing
| Include | Example |
|---|---|
| Location and object | “The AC unit on the terrace, immediately beside the antenna base.” |
| Source and revision | “Use the October scan and drawing revision B, page 2.” |
| Units and reference | “Report millimeters. The verified clear doorway width is 900 mm.” |
| What is existing or proposed | “The scan is existing; the attached unit model is proposed.” |
| Required checks | “Check the access path and manufacturer clearances supplied in the PDF.” |
| Deliverable | “A table of candidate positions, annotated views, and a PDF report.” |
| Limits on changes | “Inspect and measure first; do not delete or move existing geometry.” |
Label example dimensions as examples. Do not let the agent treat an estimate or example as a manufacturer’s requirement.
Use voice and attachments
- For voice input, select Dictate a message and allow microphone access when the browser asks.
- Speak the request, then select Finish. Recording is limited to two minutes and the supported recording size.
- Read the text produced by dictation. Check units, quantities, filenames, and object names. Dictation adds a draft; it does not send the message.
- Select Send. Use Cancel while recording if you want to discard it.
Use Attach file to add drawings, images, or specifications. You can also paste screenshots into the message box. Tell the agent which page or detail to use. Explain whether a mark shows a location or a dimension. See attachment limits and behavior.
Follow the work and correct it
The conversation records replies and tool activity. Open Details to inspect a tool result or error. Watch the scene as geometry appears. Ask the agent to show which scan points or views support its result.
The endpoint is on the outside of the frame. Keep the first endpoint, move the second to the inside face of the jamb, then repeat the measurement and replace the annotated image.
Select Stop to interrupt the task. Changes already made remain in the scene. Inspect the scene before restarting. Ask the agent which steps it completed.
History, interruptions, and returning later
- Use Search conversations to find an earlier task for the selected scene. Use Refresh conversations if the list needs updating.
- Each scene has its own conversations. Check the selected scene before assuming that a conversation is missing.
- On Free, keep the editor open while the agent works. Closing all editor tabs for the scene stops the task after a short reconnect window.
- On Pro, supported background AI work can continue after the editor closes. Return to the same scene and conversation to inspect the result.
- After an interruption, send a new request, such as “List the completed steps and continue from the last checked result.” Opening a conversation does not restart the task.
Check what the answer is based on
Ask the agent to separate measurements, fitted geometry, assumptions, and areas it could not inspect. A model can look correct and still contain errors. Check the scan and design requirements before using the result. Follow the review procedure before sharing the files.